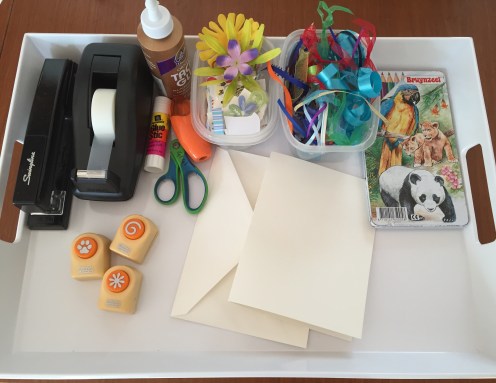
This white tray was worth its weight in gold. Its morning project created the motivation needed to hop out of bed (and not nurse)! Sort of like Crafty Santa each morning.
Ingredients:
A large tray, preferably white or a solid color to offset the project… plus basics near the tray everyday:
Colored pens or pencils
Pencil & sharpener
Scissors
Stapler
Tape
Tacky glue
Assorted craft materials (keep in bin away from little ones until the day of magic):
Construction paper or cardstock (all colors including black)
Pre-made cards & envelopes
Pompoms
Pipe cleaners
Feathers
Small jewel cabochons, stars, hearts, flowers
Assorted stickers
Small mirrors (size of a dime)
A mix of small wooden shapes (hearts of all sizes, snowflakes, animals)
Glitter glue pens
Felt
Tissue paper (solid color, scenic, abstract, and scraps)
Popsicle sticks (plain and colored)
Clothespins
Stamps & ink pads
Shaped confetti
Wood scraps (available from lumber yards)
Wood squares
Wood dowels
Ribbon (all kinds, bin of left-overs from all presents, holidays, etc.)
Doilies
Die-cut blank puzzles with envelopes
Small terra-cotta pots
Model Magic ™ in basic colors
Other: Artificial flowers (I collected several kinds when on discount) remove stems and plastic parts, store multiple petals for the right project!
Shrinky Dinks™
Die cutters (select a few favorite shapes—daisy, snowflake, leaf, snowflake, swirl, butterfly—we acquired these over time; arrival of each new one was a magic-tray focus)
Sources: Target is great for trays; craft or fabric store, Michaels, Joann Fabrics
How to:
Every morning (or when you need it), present a few chosen items and the tools needed to create the project. Put everything else away. Here are some ideas of my magic tray ideas. Age 4 and up.
Here are some ideas:
- Felt Flowers—I cut out basic flower shapes and included popsicle sticks, pompoms, small felt pieces, green felt leaves, green pipecleaners and green feathers. Child assembles flowers together. Put in vase or in mini terra-cotta pot with packing peanuts and brown Model Magic ™ on top to hold its place.
- Felt sewing—hole punched around a felt square and a long piece of ribbon to thread. Can be used as a frame with favorite piece of art glued in the center.
- Mail holders—felt cut in rectangular shapes to cover sides of clothespins. Décor to glue on top: fake mini pearls, stickers, glitter glue, pompoms, rocks, metallic small leaves
- Stationery—colorful construction paper folded as cards. Theme shaped die cut puncher, matching theme stickers, small scrap pieces of colored and/or tissue paper to cover die cut space. Make into cards and send to friends or family.
- Popsicle stick bonanza—large stack of popsicle sticks with glue to make frames, designs, fairy homes, etc.
- Punch-out Black/Stained Glass—black paper, hole puncher, die cutter, sharp pencil or push pins, thick piece of cardboard to protect work surface, colored tissue paper, gold or silver pens or white crayon. Punch holes of varying sizes and shapes or lines in black paper. Glue or tape tissue paper to back of paper. Hold to light for stained-glass effect. Write notes in white/silver/gold.
- Loads of daisies—cut out/die cut as many daisies as you can. Construction paper. Go crazy with daisies! See if you can write your name with them.
- Design a block—ask if local lumber yard has left-over wood squares. Design with tissue paper, beaded fringe, stickers, daisies, and glue.
- Butterflies everywhere—butterfly die cut, construction paper, glitter glue pens, butterfly stickers. Create!
- Collage of cut-outs—all die cuts butterflies, daisies, shiny paper, cut out your own leaves. Assemble.
- Stamper Kitty—pick out a new stamp. Ink pad or colored pens. Plain white paper. Stamp away! Try coloring parts of the stamp with colored pens rather than using the ink-pad.
- Jewels and feathers—multicolored jewels, assorted feathers, cards, glue
- Felt and groovy-mess—tie-dyed felt, ornamental tissue paper, feathers, jewels, cards…
- Just add mirrors—nickel-sized cut-out mirrors, feathers, stickers, and wood blocks. Exotic collage making.
- Popsicle sticks and Pipe-cleaners—what can you do with em?
Note: it can be fun to go craft shopping with your child. Then hide the ingredients and (s)he gets a familiar surprise—or can advise you—on ideas for the next day. Some days I gave a very clear plan on what to make; other days I put out basic materials and let the art heart fly!
If you make a base of card stock or folded cards instead of construction paper, your little one is making priceless stationery you can use for years to come. Particularly wonderful for thank-you notes.

I am all over this! I think I just needed the recipe!!
LikeLike